Thursday, December 29, 2011

Cooking for One: Butternut Squash Apple Soup

About a year ago, I had gotten some butternut squash apple soup from Panera Bread and absolutely loved it! I'm not a big fan of butternut squash, but it had sounded interesting so I tried it (and I'm glad I did!). So this year, when I went to look for it, they only had plain butternut squash soup. (Oh, the tragedy!) So I decided to try to make it myself. It turned out pretty good for a first try!


Recipe: (makes 6 servings)
1 bag frozen cubed butternut squash (approximately 2.5 cups)
2 cups apples, cored and diced (peeling optional)
3 cups water (divided)
1 tablespoon dried rosemary
1 tablespoon butter
1/2 onion, chopped
salt and pepper to taste
1/4 cup brown sugar (optional)
1/2 cup light cream


Melt butter in a large saucepan. Saute onions until translucent. Add butternut squash and cover with water (approximately 2 cups) and bring to a boil. Once boiling, add apples, rosemary (in a cheesecloth or tea strainer), and more water to cover if needed. Turn the heat down to low and simmer for about half an hour until the squash and apples are fork tender. Turn off heat. Remove the rosemary and puree the mixture using an immersion blender. (If you don't have an immersion blender, you can puree it in batches in a blender but be careful because it's hot!)


Now is the time to taste test your soup (I prefer to taste my soup before I add the cream to it, if you'd prefer, you can season after the cream instead). Does it need salt or pepper? Were the apples you used sweet enough? If not you might want to add the brown sugar. The soup is just that, soup. It shouldn't be sweet like a dessert but it should have a little sweetness to it. If you're satisfied with the taste of the soup, add your cream and blend again. Taste again and add more seasonings if needed.

I served my soup with L'oven Fresh Sweet Multi-Grain Rolls. It made a great match!


This soup freezes well.  I made it and kept 2 servings out and froze the other 4 servings for later. To reheat, bring the soup to room temperature in the refrigerator (approximately 24 hours). Cook in microwave on high 2-4 minutes (stirring at the end of each minute).  You can also reheat on the stove over medium heat.

Nutritional Information (soup only):

  • Servings Per Recipe: 6
  • Amount Per Serving
  • Calories: 156.2
  • Total Fat: 6.0 g
  • Cholesterol: 18.4 mg
  • Sodium: 18.7 mg
  • Total Carbs: 29.8 g
  • Dietary Fiber: 4.1 g
  • Protein: 1.6 g


Thursday, October 27, 2011

Cooking for One: Breakfast: Whole Wheat Pumpkin Waffles

Just in time for the taste of fall, whole wheat pumpkin (Belgian) waffles!  Although fall is not my favorite time of the year (with the impending cold weather creeping in and an end to motorcycle riding season), I do love the tastes that come along with fall and the cool crisp mornings.  It just invites creamy soups, spicy dishes and fill you up hearty meals!  

Here's your recipe (makes 6 waffles):

  • Water, 1.25 cup
  • Pumpkin, canned, 1 cup
  • Egg, fresh, 1 large
  • Vegetable Oil, 2 tbsp
  • Apple Cider Vinegar, 2 tbsp
  • Splenda Brown Sugar Blend, 2 tbsp
  • Whole Wheat Flour, 2 cup
  • Powdered Milk, nonfat, 0.5 cup
  • Baking Powder, 2 tsp
  • Baking Soda, 1 tsp
  • Pumpkin Pie Spice, 2 tbsp
  • Salt, 0.5 tsp
Preheat your Belgian waffle maker and spray with non-stick cooking spray.  (I use Pam for Grilling).  Mix the wet ingredients together in one bowl and the dry ingredients together in another bowl.  (I put the brown sugar in with the wet ingredients).  Pour the wet ingredients into the dry ones and mix thoroughly.  Allow to sit for about 5 minutes while the waffle maker is warming up and then mix again (this is because it make take a little more time for the whole wheat flour to absorb the liquid).  When your waffle maker is hot, place about 0.5 cup of batter into maker and spread out (you'll notice in my picture that they didn't spread out much to fill the waffle maker since the batter is a little thick).  Close and cook for about 2 minutes.  Because of the sugar in the batter, they will darken (and possibly burn) if you leave them in too long.  Remove the waffle and repeat the process until your batter is gone.  I usually spray my non-stick cooking spray in the waffle maker about every other waffle just so I don't have any problems removing them.  (I hate having to clean out a stuck waffle!)

I placed mine on cooling racks since I was planning to freeze these to have for quick easy breakfast meals.  After coming to room temperature, place cooling racks in the freezer.  After about 2 hours, you can remove the racks, place the waffles in a freezer bag and put back in the freezer.  To enjoy one of these, heat them up in a microwave for about 1 minute (they may become a little soggy though) or place them in a toaster oven on toast for about 10 minutes.  I like them topped with cinnamon sugar butter or toasted pecan syrup.  

I hope you enjoy!

Nutrition Facts:  Serves 6  The following is per serving:
Calories: 263, Fat: 6.5g, Cholesterol: 32mg, Sodium: 618mg, Carbohydrates: 44g, Fiber: 6.5g, Protein: 9g

**Editorial note**  If you'd like to use regular brown sugar in this recipe, it would be 4 tbsp and if you don't have pumpkin pie spice, you can replace it with 1.5 tbsp cinnamon, 1 tsp allspice, 0.5 tsp ginger and 0.5 tsp nutmeg to get about the same flavor.  You can also use 1.5 cups of milk instead of the water and powered milk in the recipe.

Sunday, October 16, 2011

House Help: Time Management - My Favorite Websites

How many times have you said "I just don't have enough time!"  If you're like the average person, you've probably said that about a million times.  Recently, I just "haven't had enough time" to blog (something I love to do!).  But when it comes down to it, that's really not true.

http://www.freeimages.co.uk/
The problem most of us have is time management.  How do we get the things done that we need to get done and still have time to do the things we want to do?

The stigmatism that the single person falls to is "You don't have a whole family to have to fit schedules in for so I don't understand why you never have any time?  There's no one else to clean up after except yourself."


This may be true but, whether one person is in the house or five people are in the house, the bathroom still has to be cleaned, the pots and pans still have to be done, lunches still need to be made, and the dog still has to be walked!  In a family, these can fall to different people.  In the single person's life, there's only one person to do these tasks.  You guessed it (and it's not your Fairy Godmother!).  

That's where time management and organization comes in really handy!  The sites I'm listing here are great for single people as well as families!  You will see that some of them are geared towards family life but they are adaptable to the single person too!

FOOD
Once A Month Mom - Now don't let the name fool you!  This free website comes up with menus every month and teaches you how to "bulk cook".  Bulk cooking lets you cook for the month in 1-2 days worth of prepping, cooking, then freezing.  One of the great advantages of this website is that you can change the meal plan to reflect how many people you are cooking for.  It even gives you a step by step "what to do next" to optimize your time in the kitchen!  They offer 6 different menu plans including traditional, gluten-free, vegetarian, diet, whole foods, and baby food.  They also have recipe cards, shopping lists, and container stickers (which contain reheating instructions) that are downloadable/printable.  This is the way to organize your meals!

CLEANING
http://www.freeimages.co.uk/
FlyLady.net - Not only does this free website give you tips on your daily routine but also has a focus area every week that they call "zones".  I don't know how many times I've been late running out of the house for work in the morning because I couldn't find something to wear.  FlyLady will help you plan your time in the morning, during the day, and in the evening so you aren't feeling rushed or stressed all the time.  With simple two to 15 minute tasks each day, you'll find that your day is running smoother and you house is becoming cleaner.  What a novelty!

DAY-TO-DAY
http://www.freeimages.co.uk/
Cozi Calendar - Although this touts itself as a "family" calendar, I use this free website as the ultimate single person's calendar!  I have calendars set up for my work schedule, cleaning schedule, appointments, activity schedule, and workout schedule.  I can look at them each separately or I can see them all together.  It has mobile applications and will integrate with Google calendar too!  Not only does it have great calendar features, but you can also keep a journal and your shopping lists through Cozi. Can you imagine having to only go to one place to get all your to-do things?  

So, there you have it.  A list of a few of my favorite websites to help get me (and keep me) organized.  What's great about these sites is that they are all free (although more features are available if you upgrade on some to a paid subscription).  [**Please remember, if you're on a site that is free, keep it free by visiting the advertisers on the page.  Even if you don't buy anything, the click will still support the page!]  

Are there any sites that you like to use regularly to keep yourself organized?

Sunday, April 24, 2011

Family Traditions: Easter

There are many traditions in families.  Just think about it a few minutes.  Maybe everyone gets together on New Year's Eve at so and so's house.  Maybe it's a certain kind of cake that someone makes for everyone's birthday.  Maybe it's a vacation spot that you go to year after year.
I don't think many people pay enough attention to traditions anymore.  Everyone is so busy and on the go that traditions get pushed to the wayside.  It is important to carry on the traditions of your family so when the younger generations come along they can relate to the older generations.  The traditions build good memories and feelings of family, connection, and love.
Today I'm going to talk about a couple of our Easter traditions.  First is bread.  On my Dad's side of the family, we make two types of Polish bread.  There's raisin and cheese.  The basic bread recipe is the same but the first one you put raisins in and the second one you roll out and put cream cheese spread (with sugar, vanilla and cream cheese) on it, roll it up and bake it.
On my Mom's side of the family, we have Paska, a traditional raisin bread, baked in a coffee can (or other cylinder pan), with or without saffron baked in, and with glaze on the top.  It is traditionally served with a cheese spread that, if done correctly, takes a couple of days to make.
Our second tradition is eggs.  My mother every year makes Pysanky.  These are the traditional decorative Easter eggs from our Russian heritage.  She only makes these during lent and every year we can't wait to see her new creations!  She has gotten very good at making them.
On my Dad's side, my grandmother every year serves hard boiled eggs, un-dyed.  I think this came about because someone asked her about Easter eggs and she just boiled up a dozen one year.  It's kind of funny because if we don't get our plain, boiled eggs, everyone asks about them (and she can't dye them either because it's now become a "tradition"!).
Last, but in no way the least, is family.  Easter is a time for celebration of life and the life after, the ressurection of Christ, the forgiveness of sins, and the love of family.  So in my family's tradition, both in English and in Russian:

Christ is Risen, Indeed He is Risen
Христос воскресе (Xristos voskrese) Christ resurrected
воистину воскресе (voistinu voskrese) truly resurrected

Be sure to click the links above to hear how to say the greeting and response!  (Use your back key in your browser to get back to this page!)

Tuesday, April 12, 2011

New Tastes: Ben and Jerry's Pumpkin Cheesecake Ice Cream

What day better than today to review Ben and Jerry's Pumpkin Cheesecake ice cream than free cone day?  From noon to 8pm today you can get a free cone at participating Ben and Jerry's ice cream stores.  (Of course there aren't any that are participating in southern New Jersey so you'll just have to buy your own!)


First impression was that it was a little soft.  At first I thought there was something wrong with my freezer but everything else seemed to be okay and when I moved the ice cream to another freezer, it didn't seem to get any harder.  So on the plus side, it's really easy to scoop!  On the negative side, it seems to melt pretty quickly.  

What intrigued me about this flavor and made me pick it up in the first place was the pumpkin.  I love, love, love pumpkin!  The first taste really did't say pumpkin to me.  It said more sour cream and cinnamon.  That being said, the flavor was very good.  Definitely tasted the cheesecake part.  As for the graham cracker swirl, well, it's more like graham cracker mush.  The graham crackers did not stay crunchy in it at all. 

Rating:  

Flavor:   Good flavor despite the fact that the pumpkin isn't very detectable.

Texture:  Soft, easy to scoop but melts quickly, graham cracker mush.

Overall Rating:  Won't buy again but not so bad that I needed to throw it out!


Monday, April 11, 2011

Cooking for One: Breakfast: Egg Wraps

This is a great basic recipe for an egg wrap.  You can make a single serving every morning or you can make a batch, freeze them, and microwave them when you want on for a quick and easy to go recipe. Whether you are making one or six, the recipe is the same.  Here's what you'll need per serving:
  • 1 egg
  • 1 teaspoon water
  • 1 medium flour wrap
  • 0.5 ounce of shredded cheese
That's it.  The basic recipe.  You can add your own flavor.  It would be approximately 2 tablespoons of whatever you'd like to add:  sauteed onions, peppers, mushrooms, ham, a half of a strip of bacon, thawed frozen spinach (or a few leaves of fresh if you'd prefer), the possibilities are endless!  I would caution on adding anything "wet" like salsa.  The wrap contents has to be on the dry side otherwise you will have a microwaved soggy mess on your hands when you try to reheat this!

Here's my recipe for batching the freezable microwaveable version, I make 6 at a time so I have them for the entire workweek!  (Here we're making pepper-onion egg wraps)
  • 6 eggs
  • 2 tablespoons water (equals 6 teaspoons)
  • 6 medium flour wraps
  • 3 ounces of shredded cheese
  • 2 cups frozen pepper and onion mixture

Beat the eggs and water together in a large bowl and set aside.  Heat a large non-stick frying pan over medium high heat.  Add the frozen peppers and onions to the pan.  Saute these together until the onions are translucent and the mixture starts to brown.

Add the egg mixture to the pan and move around until completely cooked (basically you are making a scrambled egg mixture).  You will want to cook the eggs until they are dry (some people prefer their scrambled eggs a little more moist but since you are going to wrap them up in a tortilla, you want to make sure they are on the dryer side).  Once completed remove pan from heat.


Preheat your oven to 350 degrees.  Lay out your 6 tortillas and add 0.5 ounce of cheese down the center of each one.  Divide the egg mixture and place an equal amount to top of cheese on each tortilla.


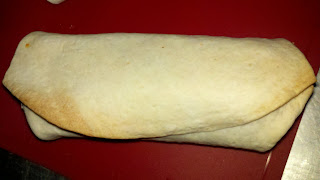
Wrap each tortilla closed by folding in the sides in slightly then rolling it up onto itself so it looks like a burrito.
Place each one on a non-stick cookie sheet (I used a silicone baking mat in the picture but would use a non-stick cookie sheet instead.  The silicone didn't allow the wrap to brown nicely).  Bake approximately 10 minutes until the tortilla starts to turn crispy.  Flip each wrap over and bake another 10 minutes.  Remove from oven and allow to cool.

To freeze, once they are at room temperature, I like to place them in a single layer in a storage container and put them in my freezer.  It's easy to grab one out of the container, wrap it in waxed paper (or place it in a baggie or reusable single serve storage container), and take it with you to microwave at work.  Or you can microwave it before you leave the house to have as a quick breakfast to go!  To reheat the frozen wrap, place on a microwave safe plate and microwave on high for 30 seconds, flip over and microwave another 30 seconds (cooking times vary).


There you have it.  For a prep/cooking time of about a half hour, you can make 6 breakfasts that you can grab and go with you.  I usually make this when I am cooking dinner so that the oven is already hot and it is saving time doing two things at once.  You can eliminate the baking part if you wanted to serve these to a family right of way.  The baking in this recipe is so that when it gets microwaved to reheat, they don't get soggy.  Bon Appetite!

Nutrition Facts:  Serves 6  The following is per serving:
Calories: 254, Fat: 12g, Cholesterol: 230mg, Sodium: 320mg, Carbohydrates: 21g, Sugar: 0.8g, Protein: 14g

Monday, April 4, 2011

Things I Love: My Keurig

Most households have a standard coffeemaker.  That big old thing that sits on your counter and usually has a half of a pot of coffee sitting in it from sometime in the past 24 hours.  Maybe you brewed it this morning and now it's dinnertime, and if you don't have a self-timing coffeemaker, then it's starting to turn into sludge.  Sounds wonderful doesn't it?

Meet my Keurig.  It's a single cup coffee brewer.  What's nice about this brewer is that you have a fresh cup of coffee whenever you want it.

The one I have is the Cuisinart Keurig.  Some of the great features of this particular one is that it has a self timer, you can set your brewing temperature, it has an auto off feature, it can brew 5 different sizes, it has a removable drip tray so you can fit your travel mug underneath of the brew spout, and it has a on-board storage location for your "my k-cup" brewer.

This coffeemaker is so easy to use that anyone can brew a good cup of coffee.  All you do is make sure the water chamber is filled with water, turn on the brewer, open the top, place a k-cup into the brewer, close the lid, choose a mug size, and press a button.  There you have it, the perfect cup of coffee every time.  

One of the great things about Keurig is they offer a wide variety of k-cups.  They have over 200 different varieties of coffee, tea (both hot and iced), hot chocolate and other beverages.  You can never say that you're bored with their selection!  My favorite k-cups include Green Mountain Coffee Nantucket Blend, Wolfgang Puck Jamaica Me Crazy Coffee, Timothy's Colombian Decaf Coffee, Celestial Seasonings Mandarin Orange Spice Herbal Tea and Twinings Earl Grey Tea.


But the number one suggestion I have is that if you're going to get a Keurig, be sure it's one that you can use the "my k-cup" with (not all the brewers will accommodate the my k-cup).  This will allow you to brew your own variety of coffee in the Keurig of your choice (and save some money too!).  Some of the brewers come with a my k-cup and some you can buy seperately.  The Cuisinart one has a location on the side to keep it in.  This is nice because you always know where it is and it protects if from getting dusty or damaged.


Here are some tips on using the my k-cup brewer.  First, you will need to make sure that your coffee is ground to the correct grind setting. The k-cup will need a coarser grind then your automatic drip coffeemaker.  My sister had suggested that it's more like the french-press grind.  If the grind is too fine, it will foam or you will have grinds in your cup (either way, not a good scenario).  

Second, you will not want to fill the mesh basket to the top.  You should leave about 1/4 to 1/8 of an inch at the top when filling the my k-cup.  You can always use less if you want a weaker cup but if you use more, you will definitely have grinds in your cup!


So, that's it, my Cuisinart Keurig brewer.  It's a must for the single person who won't drink a full pot of coffee in a day or for anyone who just likes a freshly brewed cup.  It's also great for households where there are different coffee drinkers and they like different flavors or brews.  Oh, and don't be fooled!  It's not just for coffee or tea!  It's great to heat up just the right amount of hot water for instant hot breakfast cereals too!  Enjoy!

Sunday, April 3, 2011

Introduction

I've always wanted to create a blog about the single life.  Not the single life you see all over the news, reality tv, or in entertainment magazines.  I mean the real single life (there's no Snookie here!).  A blog about shopping and cooking for one.  A blog about living alone and taking care of your household.  A blog about being happy about being single.  A blog about... well... me!

I know there have to be more people out there that are single, without children, never married, and are content with that.  They've had to figure out how to cut a 6 person recipe down into just one serving.  They've figured out which recipes are okay to make the 6 servings and freeze for dinners later in the month (and which ones are not!).  They've figured out how to do all the chores that come with having a home and having to keep it clean and still have time for a social life.  (Yeah, I'm having trouble with that one! LOL!  I mostly get the house "clean enough".)

So that's my blog in a nutshell.  Don't think that this blog is just for singles though.  A lot of what I will post will be great for everyone.  Oh, and as for children, I have my fair share of nieces and nephews to blog about sometimes, it's just that family life won't be the focus of this blog.  So, I hope you stick around and enjoy my blog.