1 butternut squash, seeded and peeled
1 1/2 small apples, cored (so that you eliminate the seeds and the arsenic in them)
1 cup coconut milk
1/2 inch piece of cinnamon
1/2 inch piece of fresh ginger
1/2 teaspoonful sea salt
pinch of chipotle chili pepper
Place all ingredients except 1/2 of an apple into Vitamix Blender. Start on variable 1 and turn up to 10 then switch to high. Blend for 8 minutes then turn down to variable 1. Carefully remove the center of the lid. Watch for the steam and don't burn yourself! It will be HOT! Drop the other 1/2 of the apple in there to coarsely chop. Turn off blender. You're soup is done!
Variations: If you don't want it that spicy, don't put the chipotle pepper in! Also if you would prefer a smooth creamy soup, you can put all the apples in at once. The reason for adding the apple at the end is to give it a little bit of texture. (I prefer it smooth myself).
Showing posts with label food. Show all posts
Showing posts with label food. Show all posts
Sunday, December 2, 2012

Vitamix Smoothie: Pomegranate, Orange, Raspberry
1/2 pomegranate
1 peeled orange
1/2 cup raspberries
1/2 cup coconut milk
Place all ingredients in blender. Start Vitamix on variable 1 and increase to 10 then flip to high. Blend approximately 30 seconds. At this point, if it's not cold enough, add a couple cubes of ice and blend or serve over ice. You could also use frozen raspberries and not have to add the ice at the end. Enjoy!
Non-paleo adult only alteration: Add about 1/4 cup of light rum, vodka, or tequila before blending.
1 peeled orange
1/2 cup raspberries
1/2 cup coconut milk
Place all ingredients in blender. Start Vitamix on variable 1 and increase to 10 then flip to high. Blend approximately 30 seconds. At this point, if it's not cold enough, add a couple cubes of ice and blend or serve over ice. You could also use frozen raspberries and not have to add the ice at the end. Enjoy!
Non-paleo adult only alteration: Add about 1/4 cup of light rum, vodka, or tequila before blending.
Sunday, November 18, 2012
Healthy Eats: Paleo Acorn Squash


So I adapted the recipe to make it Paleo. This is non-dairy, gluten-free too.
Paleo Acorn Squash
1 acorn squasholive oil
2 tablespoons of Coconut Manna or Coconut oil
1 tablespoon of Raw Honey
1 teaspoon of orange peel (or 1 tablespoon of fresh orange zest)
1/2 teaspoon pumpkin pie spice (or 1/4 teaspoon cinnamon and 1/8 teaspoon nutmeg)
1/4 teaspoon chipolte powder
Salt and pepper to taste

Preheat oven to 325. Cut acorn squash into quarters and remove seeds. Brush inside of squash with olive oil and place on a pan cut side down (forming 2 halves). Bake 45 minutes.


About 5 minutes before it's done, melt coconut manna/oil and raw honey together in a small pan on the stove (if you have one with a pour spout, like one to melt butter in, it helps). Mix in all the rest of the ingredients when melted, constantly stirring and remove from heat once melted. DO NOT BOIL!
Remove acorn squash from oven and flip over. You can do one of 2 things now. You can either scoop out the squash into a bowl, coarsely mash it up then mix the coconut mixture in with it. Or you can drizzle the coconut oil on the top of each piece of squash and place them back in the oven for about 10-15 minutes before serving. The latter makes for a great presentation, the former is good if you want to serve it to a family with children.

I've got to admit, I can't say I hate acorn squash anymore since I was already trying to figure out when I could make this recipe again. It was also so easy to make. I absolutely loved it!
Nutrition Facts: Serves 4
Amount per serving (without walnuts): Calories: 140; Fat: 8g; Carbohydrates: 17.2g; Fiber: 1.7g; Protein: 1.4g
Sunday, March 4, 2012
Healthy Eating: Eliminating Sugar
 |
| Photo: photo-dictionary.com |
 |
| Photo: photo-dictionary.com |
It's hard as a single person (or even not a single person!), constantly on the go, to choose healthy grab and go foods. Just pick up any package in a store and look for the words sugar, dextrose, syrup, nectar, <place fruit type here> concentrate or many other "sugar" code words that are in the foods we eat. It's hard, so hard, in fact, that I figured the only way I could give it up was to do it for God.
I'm Catholic and traditionally Catholics give up something for Lent. I decided I was going to give up refined sugar and anything else that would taste sweet to me (honey, molasses, agave nectar, you get the picture) and limit artificial sweeteners and anything that might have sugar in the ingredient list that didn't really taste sweet (like ketchup or crackers). The reason I decided to do this for Lent is because I wasn't giving it up for me, I was giving it up for GOD, and if you make a promise to God, you really should not try to break it! (Now please, you devout Catholics out there, I know this is something I've done between me and God and don't scold me for sharing with others!)
 |
| Photo: photo-dictionary.com |
Fat Tuesday, February 21 - Why, when we know what we're going to give up, do we indulge the day before? I had my pastries (and everyone else's pastries too!), and loved every bite! Then comes Ash Wednesday, the first day of Lent. No coffee (with artificial sweetener), no cereal (OMG look at the sugar content even for what I thought was healthy cereal!), no oatmeal (since I like brown sugar in it), no healthy meal replacement bar (it's loaded with sugar!)... panic is starting to set in... eggs... I can have eggs! Whew, good thing I had time before work to make some. Note to self: must plan meals better!
Giving up sugar isn't as easy as it sounds! Just at work, we've had 4 parties in 10 days! Someone leaving, someone getting recognition for a job well done, someone getting married, and someone having a baby. Every party had some type of pastry there to eat! About 4 days into my sugar fast, I could have fought a baby for his/her lollipop! The cravings were SO BAD! They started on the first day but slowly increased until it was almost unbearable! The only way for me to get through this was to remind myself that I gave it up for GOD not for ME! My mantra for the week was "Jesus gave you his life, you can give him your sugar." Miraculously on day 5, when I thought that I could just have something with Splenda or Nutrasweet in it, the cravings vanished. They didn't slow down, they just completely disappeared. Wow!
 |
| Photo: Starbucks.com |
 |
| Photo: sekweldinglighting.com |
So now it's been 10 days. I did have a sugar-free Starbucks drink with my sister and I had wine tasting with my best friend (but I skipped the chocolate that they recommended pairing with a couple of the wines and only went for the cheese, grapes, and a couple of crackers!) All in all, I've been doing a pretty good job!
 |
| Photo: salterhousewares.com |
So, today I decided I would weigh myself. The struggle went on in my head... Really, do you REALLY want to weigh yourself? Yes, I should to see if giving up sugar is helping my journey to a healthier weight and healthier eating. But do you REALLY, REALLY want to weigh yourself? Shouldn't you just wait until Lent is over? It's not going to do any good now. It's not going to change that you gave up sugar will it? Well, no... Then why not wait to weigh yourself. The struggle went on for a good 5 minutes I tell you!
I FINALLY broke down and decided to weigh myself. I stepped on the scale (a digital one) looked down, the stepped off. That can't be right! I did it again. Nope, still not right! I moved the scale to a different part of the floor (that part might not be level) and it said the same thing. 5 times I stepped on it with the same result. Lent has been going on for 10 days now (and is a total of 40 days). In those 10 days, I've lost 8 pounds. I did nothing but give up sugar.
 |
| Photo: betterworldbooks.com |
A couple of years ago, I got a CD-lecture series to listen to in the car on the way to and from work. It is called "Making the Shift" and is given by Dr. Wayne W. Dyer. (I highly recommend this lecture to anyone who is looking to make a shift in their way of thinking or living. He's very inspirational!) In one part of this lecture series, he talks about giving up eating sugar. He says something to the effect that he decided to give up sugar one day and he did. He also said that people couldn't believe he could do it and "wasn't it hard?" His response was that you just do it and don't think about it. You then make your choices based on what you've decided. Listening to that part of the lecture I remembered thinking, "I could NEVER give up sugar! I don't know how he's done that!"
Maybe I have given up sugar this time. I have for at least the past 10 days! We'll see how this ends up in the end but this might have been the jump start I needed to get me going into the healthy eating world again! I'm feeling better, eating better, and have been in a better mood in general. I've had more energy and don't want to be the hermit I have been for the past couple of months. I want to take my dog for a walk and enjoy being outside and more active. If giving up sugar has made me feel this good, maybe I can give it up for good this time!
Thursday, October 27, 2011
Cooking for One: Breakfast: Whole Wheat Pumpkin Waffles
Just in time for the taste of fall, whole wheat pumpkin (Belgian) waffles! Although fall is not my favorite time of the year (with the impending cold weather creeping in and an end to motorcycle riding season), I do love the tastes that come along with fall and the cool crisp mornings. It just invites creamy soups, spicy dishes and fill you up hearty meals!
Here's your recipe (makes 6 waffles):
- Water, 1.25 cup
- Pumpkin, canned, 1 cup
- Egg, fresh, 1 large
- Vegetable Oil, 2 tbsp
- Apple Cider Vinegar, 2 tbsp
- Splenda Brown Sugar Blend, 2 tbsp
- Whole Wheat Flour, 2 cup
- Powdered Milk, nonfat, 0.5 cup
- Baking Powder, 2 tsp
- Baking Soda, 1 tsp
- Pumpkin Pie Spice, 2 tbsp
- Salt, 0.5 tsp

Preheat your Belgian waffle maker and spray with non-stick cooking spray. (I use Pam for Grilling). Mix the wet ingredients together in one bowl and the dry ingredients together in another bowl. (I put the brown sugar in with the wet ingredients). Pour the wet ingredients into the dry ones and mix thoroughly. Allow to sit for about 5 minutes while the waffle maker is warming up and then mix again (this is because it make take a little more time for the whole wheat flour to absorb the liquid). When your waffle maker is hot, place about 0.5 cup of batter into maker and spread out (you'll notice in my picture that they didn't spread out much to fill the waffle maker since the batter is a little thick). Close and cook for about 2 minutes. Because of the sugar in the batter, they will darken (and possibly burn) if you leave them in too long. Remove the waffle and repeat the process until your batter is gone. I usually spray my non-stick cooking spray in the waffle maker about every other waffle just so I don't have any problems removing them. (I hate having to clean out a stuck waffle!)
I placed mine on cooling racks since I was planning to freeze these to have for quick easy breakfast meals. After coming to room temperature, place cooling racks in the freezer. After about 2 hours, you can remove the racks, place the waffles in a freezer bag and put back in the freezer. To enjoy one of these, heat them up in a microwave for about 1 minute (they may become a little soggy though) or place them in a toaster oven on toast for about 10 minutes. I like them topped with cinnamon sugar butter or toasted pecan syrup.
I hope you enjoy!
Nutrition Facts: Serves 6 The following is per serving:
Calories: 263, Fat: 6.5g, Cholesterol: 32mg, Sodium: 618mg, Carbohydrates: 44g, Fiber: 6.5g, Protein: 9g
**Editorial note** If you'd like to use regular brown sugar in this recipe, it would be 4 tbsp and if you don't have pumpkin pie spice, you can replace it with 1.5 tbsp cinnamon, 1 tsp allspice, 0.5 tsp ginger and 0.5 tsp nutmeg to get about the same flavor. You can also use 1.5 cups of milk instead of the water and powered milk in the recipe.
Monday, April 11, 2011
Cooking for One: Breakfast: Egg Wraps
This is a great basic recipe for an egg wrap. You can make a single serving every morning or you can make a batch, freeze them, and microwave them when you want on for a quick and easy to go recipe. Whether you are making one or six, the recipe is the same. Here's what you'll need per serving:
Here's my recipe for batching the freezable microwaveable version, I make 6 at a time so I have them for the entire workweek! (Here we're making pepper-onion egg wraps)
 Beat the eggs and water together in a large bowl and set aside. Heat a large non-stick frying pan over medium high heat. Add the frozen peppers and onions to the pan. Saute these together until the onions are translucent and the mixture starts to brown.
 Add the egg mixture to the pan and move around until completely cooked (basically you are making a scrambled egg mixture). You will want to cook the eggs until they are dry (some people prefer their scrambled eggs a little more moist but since you are going to wrap them up in a tortilla, you want to make sure they are on the dryer side). Once completed remove pan from heat.

Preheat your oven to 350 degrees. Lay out your 6 tortillas and add 0.5 ounce of cheese down the center of each one. Divide the egg mixture and place an equal amount to top of cheese on each tortilla.
Wrap each tortilla closed by folding in the sides in slightly then rolling it up onto itself so it looks like a burrito.


 Place each one on a non-stick cookie sheet (I used a silicone baking mat in the picture but would use a non-stick cookie sheet instead. The silicone didn't allow the wrap to brown nicely). Bake approximately 10 minutes until the tortilla starts to turn crispy. Flip each wrap over and bake another 10 minutes. Remove from oven and allow to cool.
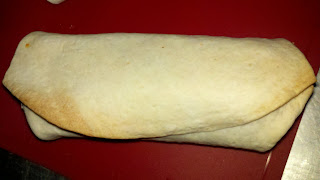
To freeze, once they are at room temperature, I like to place them in a single layer in a storage container and put them in my freezer. It's easy to grab one out of the container, wrap it in waxed paper (or place it in a baggie or reusable single serve storage container), and take it with you to microwave at work. Or you can microwave it before you leave the house to have as a quick breakfast to go! To reheat the frozen wrap, place on a microwave safe plate and microwave on high for 30 seconds, flip over and microwave another 30 seconds (cooking times vary).

There you have it. For a prep/cooking time of about a half hour, you can make 6 breakfasts that you can grab and go with you. I usually make this when I am cooking dinner so that the oven is already hot and it is saving time doing two things at once. You can eliminate the baking part if you wanted to serve these to a family right of way. The baking in this recipe is so that when it gets microwaved to reheat, they don't get soggy. Bon Appetite!
Nutrition Facts: Serves 6 The following is per serving:
Calories: 254, Fat: 12g, Cholesterol: 230mg, Sodium: 320mg, Carbohydrates: 21g, Sugar: 0.8g, Protein: 14g
- 1 egg
- 1 teaspoon water
- 1 medium flour wrap
- 0.5 ounce of shredded cheese
Here's my recipe for batching the freezable microwaveable version, I make 6 at a time so I have them for the entire workweek! (Here we're making pepper-onion egg wraps)
- 6 eggs
- 2 tablespoons water (equals 6 teaspoons)
- 6 medium flour wraps
- 3 ounces of shredded cheese
- 2 cups frozen pepper and onion mixture

 Beat the eggs and water together in a large bowl and set aside. Heat a large non-stick frying pan over medium high heat. Add the frozen peppers and onions to the pan. Saute these together until the onions are translucent and the mixture starts to brown.
  Add the egg mixture to the pan and move around until completely cooked (basically you are making a scrambled egg mixture). You will want to cook the eggs until they are dry (some people prefer their scrambled eggs a little more moist but since you are going to wrap them up in a tortilla, you want to make sure they are on the dryer side). Once completed remove pan from heat.
Preheat your oven to 350 degrees. Lay out your 6 tortillas and add 0.5 ounce of cheese down the center of each one. Divide the egg mixture and place an equal amount to top of cheese on each tortilla.
Wrap each tortilla closed by folding in the sides in slightly then rolling it up onto itself so it looks like a burrito.


To freeze, once they are at room temperature, I like to place them in a single layer in a storage container and put them in my freezer. It's easy to grab one out of the container, wrap it in waxed paper (or place it in a baggie or reusable single serve storage container), and take it with you to microwave at work. Or you can microwave it before you leave the house to have as a quick breakfast to go! To reheat the frozen wrap, place on a microwave safe plate and microwave on high for 30 seconds, flip over and microwave another 30 seconds (cooking times vary).

There you have it. For a prep/cooking time of about a half hour, you can make 6 breakfasts that you can grab and go with you. I usually make this when I am cooking dinner so that the oven is already hot and it is saving time doing two things at once. You can eliminate the baking part if you wanted to serve these to a family right of way. The baking in this recipe is so that when it gets microwaved to reheat, they don't get soggy. Bon Appetite!
Nutrition Facts: Serves 6 The following is per serving:
Calories: 254, Fat: 12g, Cholesterol: 230mg, Sodium: 320mg, Carbohydrates: 21g, Sugar: 0.8g, Protein: 14g
Monday, April 4, 2011
Things I Love: My Keurig
Most households have a standard coffeemaker. That big old thing that sits on your counter and usually has a half of a pot of coffee sitting in it from sometime in the past 24 hours. Maybe you brewed it this morning and now it's dinnertime, and if you don't have a self-timing coffeemaker, then it's starting to turn into sludge. Sounds wonderful doesn't it?


Meet my Keurig. It's a single cup coffee brewer. What's nice about this brewer is that you have a fresh cup of coffee whenever you want it.

The one I have is the Cuisinart Keurig. Some of the great features of this particular one is that it has a self timer, you can set your brewing temperature, it has an auto off feature, it can brew 5 different sizes, it has a removable drip tray so you can fit your travel mug underneath of the brew spout, and it has a on-board storage location for your "my k-cup" brewer.
This coffeemaker is so easy to use that anyone can brew a good cup of coffee. All you do is make sure the water chamber is filled with water, turn on the brewer, open the top, place a k-cup into the brewer, close the lid, choose a mug size, and press a button. There you have it, the perfect cup of coffee every time.

One of the great things about Keurig is they offer a wide variety of k-cups. They have over 200 different varieties of coffee, tea (both hot and iced), hot chocolate and other beverages. You can never say that you're bored with their selection! My favorite k-cups include Green Mountain Coffee Nantucket Blend, Wolfgang Puck Jamaica Me Crazy Coffee, Timothy's Colombian Decaf Coffee, Celestial Seasonings Mandarin Orange Spice Herbal Tea and Twinings Earl Grey Tea.
But the number one suggestion I have is that if you're going to get a Keurig, be sure it's one that you can use the "my k-cup" with (not all the brewers will accommodate the my k-cup). This will allow you to brew your own variety of coffee in the Keurig of your choice (and save some money too!). Some of the brewers come with a my k-cup and some you can buy seperately. The Cuisinart one has a location on the side to keep it in. This is nice because you always know where it is and it protects if from getting dusty or damaged.

Here are some tips on using the my k-cup brewer. First, you will need to make sure that your coffee is ground to the correct grind setting. The k-cup will need a coarser grind then your automatic drip coffeemaker. My sister had suggested that it's more like the french-press grind. If the grind is too fine, it will foam or you will have grinds in your cup (either way, not a good scenario).
Second, you will not want to fill the mesh basket to the top. You should leave about 1/4 to 1/8 of an inch at the top when filling the my k-cup. You can always use less if you want a weaker cup but if you use more, you will definitely have grinds in your cup!
So, that's it, my Cuisinart Keurig brewer. It's a must for the single person who won't drink a full pot of coffee in a day or for anyone who just likes a freshly brewed cup. It's also great for households where there are different coffee drinkers and they like different flavors or brews. Oh, and don't be fooled! It's not just for coffee or tea! It's great to heat up just the right amount of hot water for instant hot breakfast cereals too! Enjoy!
Subscribe to:
Posts (Atom)